These are the shed building plans for a sturdy spacious storage shed which has
- Plenty of storage space
- double door access
- greenhouse styling
- low maintenance exterior


Shed Building Plans and Blueprints for a Spacious Strong Wooden Shed
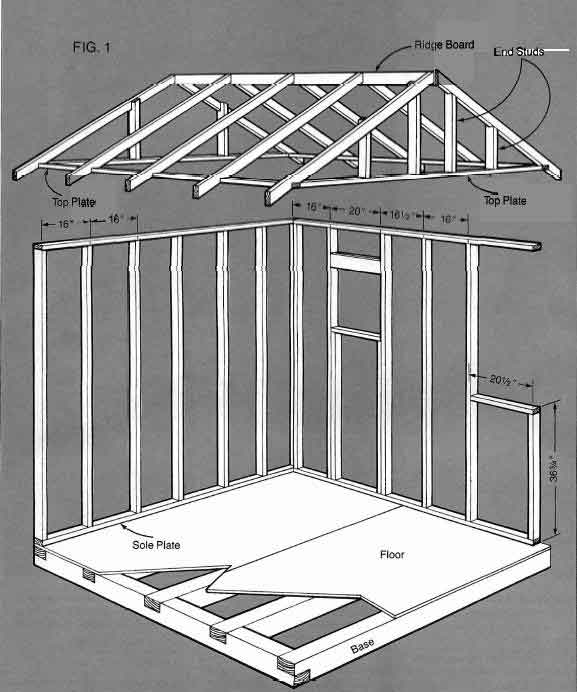
- The floor base (96″x96″) is constructed with 6″x6″ pressure-treated beams, lap-jointed together and nailed with 5″ spikes. (Base is also dug into the ground and levelled). Two sheets of 4′ x8′ x s/a” T&G exterior plywood are nailed to this frame to form the floor .
- Walls consist of studs, a single sole plate and a double top plate. Studs for wall framing are cut 791/2″ to give a total height of 7′ from the floor to top of double top plate.
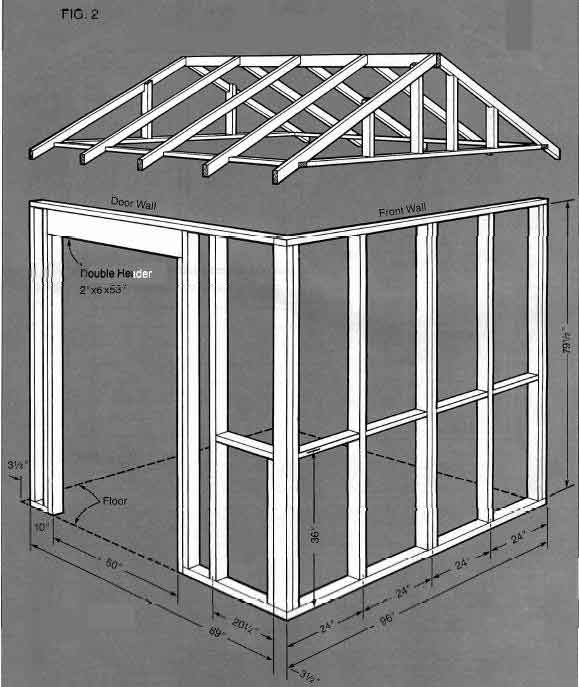
- Front Wall – (84″h.x96″w.) – has 24″ centres with double end and middle studs. Toenail spacers 36″ from the floor to the centre line of spacers .
- Back Wall – (84″h.x96″w.) – conventional construction on 16″ centres (Fig. 1 of the shed building plans).
- Door Wall – 84″high by only 89″ wide to fit between front and back wall. Leave a 50″ opening for door and nail a double 2″x6″x53″ header at the top of doorway (Fig. 1 of the garden shed plans).
- Window Wall – (84″h.x84″w.) – frame window opening to height and width you require, allowing sufficient room for casing around window. 48″).
- Allow for a 2″x6″x8′ ridge board where rafters meet at the top. Rafters also have a 6″ overhang. Nail rafters to top plate and ridge board, (24″ centres). Erect walls by nailing through the sole plate into the floor, then bind the four walls together at the top with the top plate (shown in Fig. 1 on the rafter assembly).
- Temporary diagonal bracing nailed to walls will help keep the structure rigid. Lay out and cut 10 rafters using a 6 in 12 pitch, (6″ rise for every 12″ of run)
- Fill in gable ends with end studs to match the front and back wall studs as per the shed plans. The two middle end studs on the shed front should be 12” apart to accommodate the louver. (These two end studs should have 12″ between each other, not 12″ from centre to centre.)
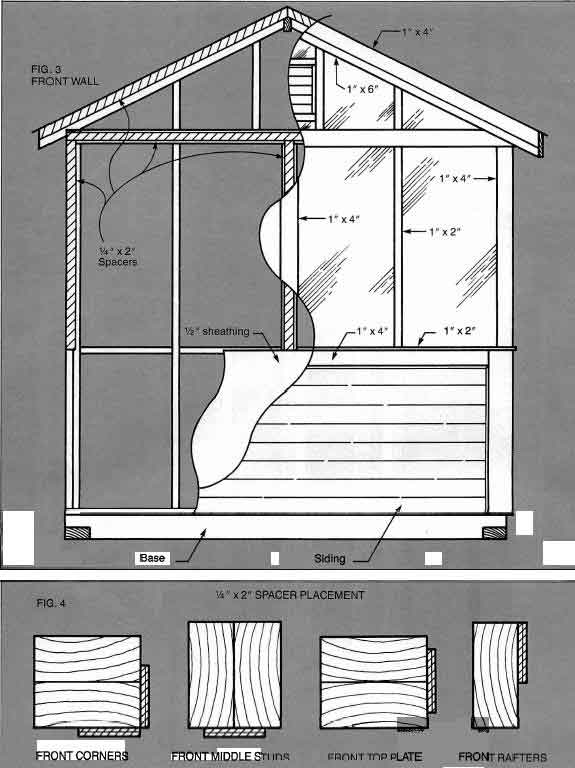
- Nail 1/zV sheathing to walls. On the front and side walls, apply sheathing only halfway across horizontal 2″x4″ spacers (at 36″ level) and halfway across the vertical 2″x4″ on each side where the window and wall meet. This 2″x4″ is 20 1/2″ from each front corner.
- Nail 5/8″ tongue and groove sheathing to roof. Allow approximately 1 1/2″ of roofing to overhang the rafter ends.We used GE Lexan for windows which is about ¼” thick, hollow core material, UV stabilized to prevent yellowing. (A sheet is 1/4″x4’x20’.) Strips of I /2” x 2″ plywood were cut and nailed to the 2″x4″s as shown in Figs. 3 and 4. Cut Lexan to fit between these spacers on the front, two sides and front gable end.
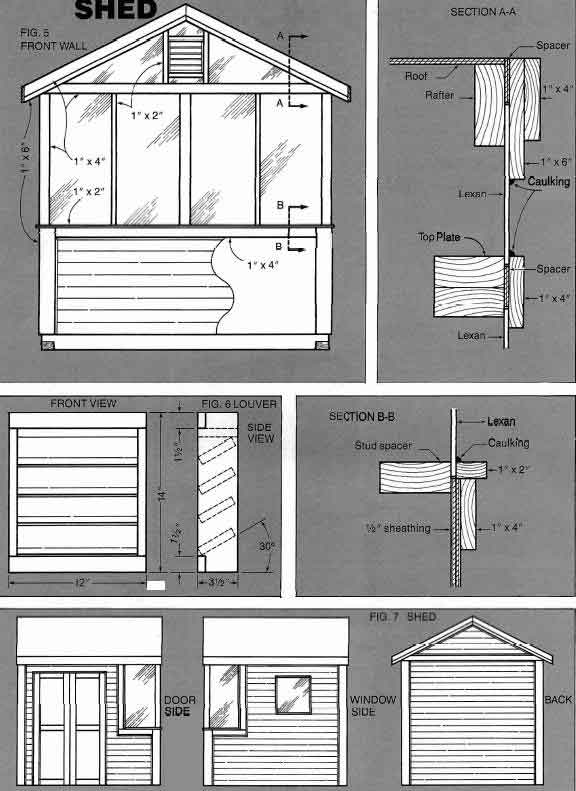
- Window and Trim Installation – Trim lower front corners with 1 “x6″ pine from floor level to sheathing. Nail l”x4” pine horizontally across the front and sides flush with sheathing, and vertically on the side stud, also flush with sheathing (see Fig. 5 of the shed crafting diagrams).
- Put Lexan in place and trim with l”x2″ along the bottom edge of sheathing, nailed into the 1 “x4”.Cut and nail 1″ x 6″ pine to cover face of rafter ends (see Fig. 5, section A-A of the shed building plans).
- Nail through the 1/4″x2″ plywood spacer. Trim over the l”x6″ with 1 “x4” pine. Use 1 “x4″ pine to cover front top plate, nailing through the ‘/A” plywood spacer. Nail l”x4″ pine to trim the outside corners and middle studs.
- Cut and nail 1 “x2″ pine through the Lexan to cover the 2″x4” studs on front.Build louver as shown in Fig. 6 of diy shed plans , using 1″x2″ and l”x4″ pine. Insert louver 31/4″ above Lexan so facing will be flush with louver face. Nail 1 “x2” pine to face exposed end studs under the gable ends and on each side of louver. Caulk around all windows.
- Cut and fit 1 “x6″ casing to accommodate window (on the window wall), set casing 3 1/4” out from sheathing to allow for the siding thickness. Install window.
- Cut and nail l” x 6″ casing for the door opening, once again setting it 3 1/4″ past the sheathing.
- Trim rafters on the back wall as you did the front, (see Fig. 7). Trim backcorners with 1 “x6” pine and 1 “x4” across the top plate (over sheathing).
- Soffit rafter ends with 3/4″ plywood and use 1 “x6” pine for fascia.
- Build two doors, 24″ wide by 74″ high, using 3 1/4″ plywood. Trim with 1″x4″ pine .
- Paint all trim and doors, then install doors.
- Shingle roof and apply 4″ vinyl siding to exposed sheathing


